If you haven't created the WCF Service go to following link to
create the Service.
Note:-
1. First few steps are used for when we want to consume the
Service in the development mode.
2. If your service is hosted on IIS, SelfHost, skip the first few
steps.
Step 1:- Right Click on Project Root Folder => Click on Properties

Step 2:- Select Web Tab
=> Change Selection Specific Page to Current Page


Step 3:- Left click on EmployeeWcfService => Click on Save Selected Items

OR you can use Ctrl + S to save file
Step 4:- Run the Project => Click on EmployeeService.svc

Step 5:- Copy the
URL http://localhost:52923/EmployeeService.svc?wsdl =>
Leave Browser to Running Mode

Note:-
If we stop the Browser our Local IIS Express Server also stopped.
For consuming the Service we required our Service in running state.
Let's Start
Step 1:- Open Visual Studio 2013
Step 2:- Go to File => New => Project...
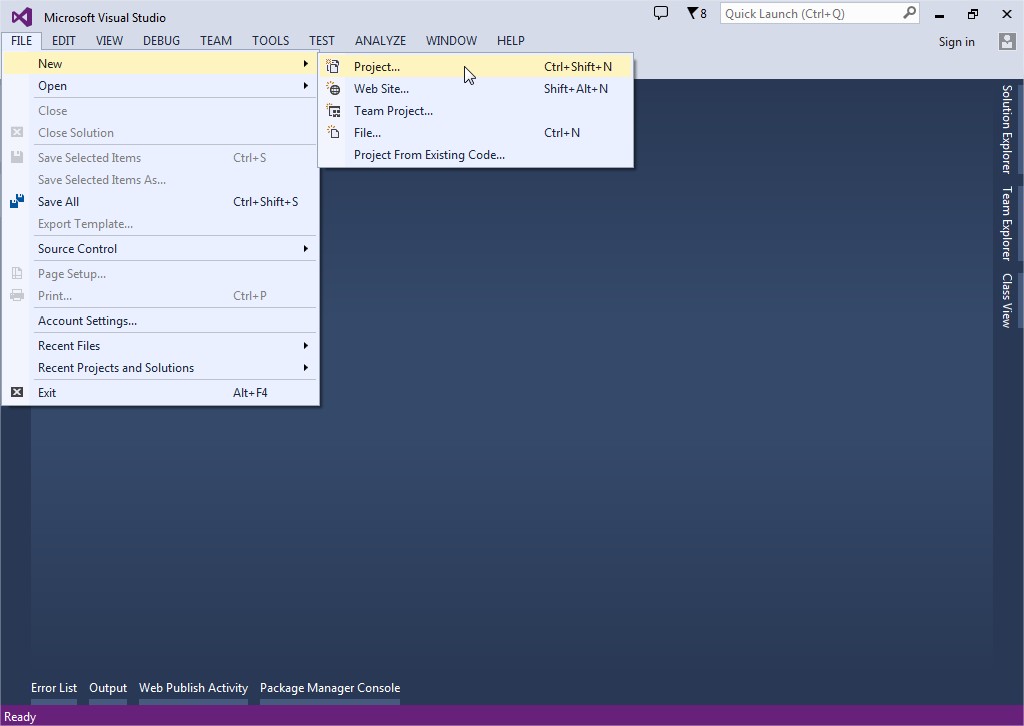
Step 3:- Expand Left Pane
Templates => Visual C# => Select Windows Form Application from Middle
pane

Step 4:- Give Name ConsumeWcfService =>
Click OK


Step 5:- Open Solution
Explorer

Step 6:- Right Click on
References => Add Service References…

Step 7:- Add Service
References Window will be open => Past the URL http://localhost:52923/EmployeeService.svc?wsdl in
Address box => Click on Go Button => If service successfully run, you
will see EmployeeService in Left box


Step 8:- Expand the
EmployeeService

Step 9:- Give Namespace
Name EmployeeWcfServiceReference => Click on OK Button

You will see EmployeeWcfServiceReference References added in your project.

Step
10:- Design the page as shown below
|
Label
Properties
|
|
|
Name
|
Text
|
|
lblId
|
Id
|
|
lblName
|
Name
|
|
lblEmail
|
Email
|
|
lblAge
|
Age
|
|
lblGender
|
Gender
|
|
TextBox
Properties
|
|
|
Name
|
Text
|
|
txtId
|
|
|
txtName
|
|
|
txtEmail
|
|
|
txtAge
|
|
|
txtGnder
|
|
|
Button
Properties
|
|
|
Name
|
Text
|
|
btnSearchById
|
Search By Id
|
|
btnInsert
|
Insert
|
|
btnUpdate
|
Update
|
|
btnDelete
|
Delete
|
|
btnAll
|
All Employee
|

Step 11:- If Design is
completed. Then click on each button to generate button event

Step 12:- Copy Past below code in respective button click event
private void btnSearchById_Click(object sender, EventArgs e)
{
int id
= Convert.ToInt32(txtId.Text);
List<Employee>
employee = employeeServiceClient.GetDataById(id).ToList();
foreach (var emp in employee)
{
txtName.Text = emp.Name;
txtEmail.Text = emp.Email;
txtAge.Text = Convert.ToString(emp.Age);
txtGender.Text = emp.Name;
}
}
private void btnInsert_Click(object sender, EventArgs e)
{
Employee employee
= new Employee();
employee.Id = Convert.ToInt32(txtId.Text);
employee.Name = txtName.Text;
employee.Email = txtEmail.Text;
employee.Age = Convert.ToInt32(txtAge.Text);
employee.Gender = txtGender.Text;
int i
= employeeServiceClient.AddEmployee(employee);
if (i
> 0)
{
MessageBox.Show("Record
Added");
}
else
{
MessageBox.Show("Record
Not Added");
}
}
private void btnUpdate_Click(object sender, EventArgs e)
{
Employee employee
= new Employee();
employee.Id = Convert.ToInt32(txtId.Text);
employee.Name = txtName.Text;
employee.Email = txtEmail.Text;
employee.Age = Convert.ToInt32(txtAge.Text);
employee.Gender = txtGender.Text;
int i =
employeeServiceClient.UpdateEmployee(employee);
if (i
> 0)
{
MessageBox.Show("Record
Updated");
}
else
{
MessageBox.Show("Record
Not Updated");
}
}
private void btnDelete_Click(object sender, EventArgs e)
{
int id
= Convert.ToInt32(txtId.Text);
int i
= employeeServiceClient.DeleteEmployee(id);
if (i
> 0)
{
MessageBox.Show("Record
Deleted");
}
else
{
MessageBox.Show("Record
Not Deleted");
}
}
private void btnAll_Click(object sender, EventArgs e)
{
List<Employee>
employee = employeeServiceClient.GetData().ToList();
dataGridView1.DataSource = employee;
}

Add following Refererence
using ConsumeWcfService.EmployeeWcfServiceReference;
Step 13:- Complete Code
using System;
using System.Collections.Generic;
using System.ComponentModel;
using System.Data;
using System.Drawing;
using System.Linq;
using System.Text;
using System.Threading.Tasks;
using System.Windows.Forms;
using ConsumeWcfService.EmployeeWcfServiceReference;
namespace ConsumeWcfService
{
public partial class Form1 : Form
{
EmployeeServiceClient employeeServiceClient
= new EmployeeServiceClient();
public Form1()
{
InitializeComponent();
}
private void btnSearchById_Click(object sender, EventArgs e)
{
int id
= Convert.ToInt32(txtId.Text);
List<Employee>
employee = employeeServiceClient.GetDataById(id).ToList();
foreach (var emp in employee)
{
txtName.Text = emp.Name;
txtEmail.Text = emp.Email;
txtAge.Text = Convert.ToString(emp.Age);
txtGender.Text = emp.Name;
}
}
private void btnInsert_Click(object sender, EventArgs e)
{
Employee employee
= new Employee();
employee.Id = Convert.ToInt32(txtId.Text);
employee.Name = txtName.Text;
employee.Email = txtEmail.Text;
employee.Age = Convert.ToInt32(txtAge.Text);
employee.Gender = txtGender.Text;
int i
= employeeServiceClient.AddEmployee(employee);
if (i
> 0)
{
MessageBox.Show("Record
Added");
}
else
{
MessageBox.Show("Record
Not Added");
}
}
private void btnUpdate_Click(object sender, EventArgs e)
{
Employee employee
= new Employee();
employee.Id = Convert.ToInt32(txtId.Text);
employee.Name = txtName.Text;
employee.Email = txtEmail.Text;
employee.Age = Convert.ToInt32(txtAge.Text);
employee.Gender = txtGender.Text;
int i
= employeeServiceClient.UpdateEmployee(employee);
if (i
> 0)
{
MessageBox.Show("Record
Updated");
}
else
{
MessageBox.Show("Record
Not Updated");
}
}
private void btnDelete_Click(object sender, EventArgs e)
{
int id = Convert.ToInt32(txtId.Text);
int i
= employeeServiceClient.DeleteEmployee(id);
if (i
> 0)
{
MessageBox.Show("Record
Deleted");
}
else
{
MessageBox.Show("Record
Not Deleted");
}
}
private void btnAll_Click(object sender, EventArgs e)
{
List<Employee> employee
= employeeServiceClient.GetData().ToList();
dataGridView1.DataSource = employee;
}
}
}
We have Successfully integrated the service with
Client.
Let's Test
Step 1:- Enter Employee Id 1 in Id TextBox field
and Click on Search By Id button
You will get the Employee Id 1 detail

Step 2:- Enter following details in respective field and click on
Insert button
Id = 0
Name = Ram
Email = ram@gmail.com
Age = 25
Gender = Male
Here we are passing Id = 0 because in database employee id column
is identity and In insert case its generate auto Employee Id.

New Record
added in Employee table
select * from tblEmployee
|
Id
|
Name
|
Email
|
Age
|
Gender
|
|
1
|
Sara Nan
|
Sara.Nani@test.com
|
30
|
Female
|
|
2
|
James Histo
|
James.Histo@test.com
|
33
|
Male
|
|
3
|
Mary Jane
|
Mary.Jane@test.com
|
28
|
Female
|
|
4
|
Paul Sensit
|
Paul.Sensit@test.com
|
29
|
Male
|
|
5
|
Ram
|
ram@gmail.com
|
25
|
Male
|
Step 3:- Enter Employee Id 1 in Id TextBox field and Click on Search By Id button => Change Email Id Sara.Nani@test.com to Sara.Nani@gmail.com => click on Update button

Here you will
see the email id Updated Sara.Nani@test.com to
Sara.Nani@gmail.com
in the Employee table who’s Employee Id is 1.
select * from tblEmployee
|
Id
|
Name
|
Email
|
Age
|
Gender
|
|
1
|
Sara Nan
|
Sara.Nani@gmail.com
|
30
|
Female
|
|
2
|
James Histo
|
James.Histo@test.com
|
33
|
Male
|
|
3
|
Mary Jane
|
Mary.Jane@test.com
|
28
|
Female
|
|
4
|
Paul Sensit
|
Paul.Sensit@test.com
|
29
|
Male
|
|
5
|
Ram
|
ram@gmail.com
|
25
|
Male
|
Step 4:- Enter Employee Id 5 in Id TextBox field and Click on Search By Id button => click on Delete button

Here
you will see the who’s Employee Id is 5 deleted from the Employee table.
select * from tblEmployee
|
Id
|
Name
|
Email
|
Age
|
Gender
|
|
1
|
Sara Nan
|
Sara.Nani@test.com
|
30
|
Female
|
|
2
|
James Histo
|
James.Histo@test.com
|
33
|
Male
|
|
3
|
Mary Jane
|
Mary.Jane@test.com
|
28
|
Female
|
|
4
|
Paul Sensit
|
Paul.Sensit@test.com
|
29
|
Male
|
Step 5:- Click on All Employee button to List all Employee

No comments:
Post a Comment